Create your first HTTP endpoint with Swift on AWS Lambda
This tutorial shall help you to create and deploy your first Swift Lambda HTTP endpoint. It assumes that you have completed my Getting started with Swift AWS Lambda Runtime tutorial, since it starts where the former ended. We will modify the existing code to work as an HTTP endpoint.
AWS Services integrate with Lambda by sending special json payloads to Lambda. swift-aws-lambda-runtime already offers implementations for a number of these services out of the box with the AWSLambdaEvents library. To integrate your Lambda with an AWS Service your Lambda’s input and output types must match the requirements of the invoking service.
In this example we will use the Amazon API Gateway’s HTTP API Service to build an HTTP endpoint with Lambda. Sometimes the HTTP API Service within Amazons API Gateway is also referred to as APIGateway v2. Still confused? I guess the Amazon APIGateway naming is the hardest part in this tutorial.
You can find the resulting code on GitHub.
If you have any questions or recommendations, contact me on twitter or open an issue on GitHub so that you can get your question answered and this tutorial can be improved.
Note: The following instructions were recorded on July 27, 2020 and the GUI may have changed since then. Feel free to contact me on twitter if you see a different one.
Step 1: Modify the Package.swift
To integrate with AWS’ APIGateway we need to include another dependency from the swift-aws-lambda-runtime package: AWSLambdaEvents. It offers a bunch of AWS event structs that make it easier to integrate your Lambda into the AWS ecosystem.
Add AWSLambdaEvents to your target’s dependencies:
.product(name: "AWSLambdaEvents", package: "swift-aws-lambda-runtime"),
And rename your target and product from SquareNumber to HelloWorld.
In the end your Package.swift should look like this:
// swift-tools-version:5.2
// The swift-tools-version declares the minimum version of Swift required to build this package.

import PackageDescription

let package = Package(
  name: "HelloWorld",
  products: [
    .executable(name: "HelloWorld", targets: ["HelloWorld"]),
  ],
  dependencies: [
    .package(url: "https://github.com/swift-server/swift-aws-lambda-runtime.git", .upToNextMajor(from:"0.3.0")),
  ],
  targets: [
    .target(
      name: "HelloWorld",
      dependencies: [
        .product(name: "AWSLambdaRuntime", package: "swift-aws-lambda-runtime"),
        .product(name: "AWSLambdaEvents", package: "swift-aws-lambda-runtime"),
      ]
    ),
  ]
)
Next you must rename your “SquareNumbers” folder in Sources to “HelloWorld” to match the new Package.swifts naming.
Step 2: Use the correct Event Types
In the main.swift import our new dependency first by adding:
import AWSLambdaEvents
As mentioned before: To integrate with an AWS Service, the Lambda’s input and output types must match the events the service sends. For this reason, to integrate with APIGateway v2 our input is of type APIGateway.V2.Request and our output is of type APIGateway.V2.Response. Let’s change our Lambda.run method to the following:
Lambda.run { (context, request: APIGateway.V2.Request, callback: @escaping (Result<APIGateway.V2.Response, Error>) -> Void) in
  preconditionFailure("Not implemented yet")
}
Step 3: Implement the Lambda
The Lambda already compiles, but it crashes immediately. So let’s build some logic!
First let’s always respond with “Hello World”. For this we call our callback with an APIGateway.V2.Response in which we set the statuscode to .ok and the body to "Hello World".
Lambda.run { (context, request: APIGateway.V2.Request, callback: @escaping (Result<APIGateway.V2.Response, Error>) -> Void) in
  callback(.success(APIGateway.V2.Response(statusCode: .ok, body: "Hello World")))
}
By setting the environment variable LOCAL_LAMBDA_SERVER_ENABLED to true in the targets build settings you enable local debugging support.
⚠️ Warning: Since we have renamed our Swift Package Manager target in Step 1, Xcode has created a new target “HelloWorld” for us. For this reason the environment variable
LOCAL_LAMBDA_SERVER_ENABLEDmust be set totrueagain in the new “HelloWorld” target!
It might be assumed that we are now able to invoke the Lambda simply by calling:
$ curl -i http://localhost:7000/invoke
The response looks like this:
HTTP/1.1 404 Not Found
content-length: 0
404 is status not found. But we did return .ok in the code… Why is this happening?
Even though our Lambda will serve HTTP requests, its input and output are still json and not an HTTP request. This is why we have made two mistakes:
- We tried to call the
/invokeendpoint with aGETmethod, but it always has to be aPOST. - We did not supply a json payload for the Lambda to deal with.
Since we will use Amazon API Gateway, incoming HTTP request will be transformed into json by the API Gateway. The created json request is then handed over to Lambda. The Lambda will process the request and respond with json, which the API Gateway will then translate back into an outgoing HTTP response.
Incoming HTTP requests will look like this after they have been transformed to json:
{
    "routeKey":"GET /hello",
    "version":"2.0",
    "rawPath":"/hello",
    "stageVariables":{},
    "requestContext":{
        "timeEpoch":1587750461466,
        "domainPrefix":"hello",
        "accountId":"0123456789",
        "stage":"$default",
        "domainName":"hello.test.com",
        "apiId":"pb5dg6g3rg",
        "requestId":"LgLpnibOFiAEPCA=",
        "http":{
            "path":"/hello",
            "userAgent":"Paw/3.1.10 (Macintosh; OS X/10.15.4) GCDHTTPRequest",
            "method":"GET",
            "protocol":"HTTP/1.1",
            "sourceIp":"91.64.117.86"
        },
        "time":"24/Apr/2020:17:47:41 +0000"
    },
    "isBase64Encoded":false,
    "rawQueryString":"",
    "headers":{
        "host":"hello.test.com",
        "user-agent":"Paw/3.1.10 (Macintosh; OS X/10.15.4) GCDHTTPRequest",
        "content-length":"0"
    }
}
So let’s invoke our Lambda with the example payload from above, using the POST method:
$ curl --header "Content-Type: application/json" \
  --request POST \
  --data '{
        "routeKey":"GET /hello",
        "version":"2.0",
        "rawPath":"/hello",
        "stageVariables":{},
        "requestContext":{
            "timeEpoch":1587750461466,
            "domainPrefix":"hello",
            "accountId":"0123456789",
            "stage":"$default",
            "domainName":"hello.test.com",
            "apiId":"pb5dg6g3rg",
            "requestId":"LgLpnibOFiAEPCA=",
            "http":{
                "path":"/hello",
                "userAgent":"Paw/3.1.10 (Macintosh; OS X/10.15.4) GCDHTTPRequest",
                "method":"GET",
                "protocol":"HTTP/1.1",
                "sourceIp":"91.64.117.86"
            },
            "time":"24/Apr/2020:17:47:41 +0000"
        },
        "isBase64Encoded":false,
        "rawQueryString":"",
        "headers":{
            "host":"hello.test.com",
            "user-agent":"Paw/3.1.10 (Macintosh; OS X/10.15.4) GCDHTTPRequest",
            "content-length":"0"
        }
    }' \
  http://localhost:7000/invoke
The response should look like this:
{"statusCode":200,"body":"Hello World"}
Step 4: JSON
Next, let’s change our Lambda to handle a json input on the /hello route with method POST. The input should look like this: {"name":"fabian"} and the output like this {"hello":"fabian"}.
-
To represent our json input and output let’s first change our
InputandOutputstructs to:struct Input: Codable { let name: String } struct Output: Codable { let hello: String } -
As you may have realized by now, the
APIGateway.V2.ResponseandAPIGateway.V2.Responsehave both a propertybodythat is of type optionalString. That means, we get a payload as aStringand not asData(which is what you normally have, if you deal with responses fromNSURLSessionfor example). That’s why, if you get an HTTP request that has json as its payload, we need to decode the payload from aStringinstead ofData. If we want to reply with a json response, we further have to encode the payload as aString. To ease the process we can use the extensions below, which can be copied below theLambda.runcommand:extension JSONEncoder { func encodeAsString<T: Encodable>(_ value: T) throws -> String { try String(decoding: self.encode(value), as: Unicode.UTF8.self) } } extension JSONDecoder { func decode<T: Decodable>(_ type: T.Type, from string: String) throws -> T { try self.decode(type, from: Data(string.utf8)) } }⚠️ Warning: You have to
import Foundation, to get this code to compile. -
Since we want to reuse our
JSONEncoderandJSONDecoderfor every request (this will yield better performance), an encoder and decoder should be created before ourLambda.runmethod. That way, they can be captured within our Lambda callback.let jsonEncoder = JSONEncoder() let jsonDecoder = JSONDecoder() Lambda.run { (context, request: APIGateway.V2.Request, callback: @escaping (Result<APIGateway.V2.Response, Error>) -> Void) in callback(.success(APIGateway.V2.Response(statusCode: .ok, body: "Hello World"))) } -
Now it’s finally time to implement the Lambda itself:
First, let’s check if we have received a
POSTrequest to the/hellopath. Otherwise a statuscode404(Not found) should be returned.guard request.context.http.method == .POST, request.context.http.path == "/hello" else { return callback(.success(APIGateway.V2.Response(statusCode: .notFound))) }Next, the request’s payload needs to be decoded. If the request doesn’t have a body, we will just use an empty string instead. In this case or any other malformed json payload case, the decoder will throw an error, which will be signaled to the user by statuscode
400(bad request).do { let input = try jsonDecoder.decode(Input.self, from: request.body ?? "") } catch { callback(.success(APIGateway.V2.Response(statusCode: .badRequest))) }If successful, we will create an
Outputstruct and encode it back into json. To make clients aware that they will receive a json payload, acontent-typeheader can be added:let responseBody = Output(hello: input.name) let body = try jsonEncoder.encodeAsString(responseBody) callback(.success(APIGateway.V2.Response( statusCode: .ok, multiValueHeaders: ["content-type": ["application/json"]], body: body))) -
Putting it all together your code should look like this:
import AWSLambdaRuntime import AWSLambdaEvents import Foundation struct Input: Codable { let name: String } struct Output: Codable { let hello: String } let jsonEncoder = JSONEncoder() let jsonDecoder = JSONDecoder() Lambda.run { (context, request: APIGateway.V2.Request, callback: @escaping (Result<APIGateway.V2.Response, Error>) -> Void) in guard request.context.http.method == .POST, request.context.http.path == "/hello" else { return callback(.success(APIGateway.V2.Response(statusCode: .notFound))) } do { let input = try jsonDecoder.decode(Input.self, from: request.body ?? "") let body = try! jsonEncoder.encodeAsString(Output(hello: input.name)) callback(.success(APIGateway.V2.Response( statusCode: .ok, multiValueHeaders: ["content-type": ["application/json"]], body: body))) } catch { callback(.success(APIGateway.V2.Response(statusCode: .badRequest))) } } extension JSONEncoder { func encodeAsString<T: Encodable>(_ value: T) throws -> String { try String(decoding: self.encode(value), as: Unicode.UTF8.self) } } extension JSONDecoder { func decode<T: Decodable>(_ type: T.Type, from string: String) throws -> T { try self.decode(type, from: Data(string.utf8)) } } -
Let’s test this locally.
Build and run your target locally and invoke on your command line:
 $ curl --header "Content-Type: application/json" \
   --request POST \
   --data '{
         "routeKey":"POST /hello",
         "version":"2.0",
         "rawPath":"/hello",
         "stageVariables":{},
         "requestContext":{
             "timeEpoch":1587750461466,
             "domainPrefix":"hello",
             "accountId":"0123456789",
             "stage":"$default",
             "domainName":"hello.test.com",
             "apiId":"pb5dg6g3rg",
             "requestId":"LgLpnibOFiAEPCA=",
             "http":{
                 "path":"/hello",
                 "userAgent":"Paw/3.1.10 (Macintosh; OS X/10.15.4) GCDHTTPRequest",
                 "method":"POST",
                 "protocol":"HTTP/1.1",
                 "sourceIp":"91.64.117.86"
             },
             "time":"24/Apr/2020:17:47:41 +0000"
         },
         "body": "{\"name\":\"Fabian\"}",
         "isBase64Encoded":false,
         "rawQueryString":"",
         "headers":{
             "host":"hello.test.com",
             "user-agent":"Paw/3.1.10 (Macintosh; OS X/10.15.4) GCDHTTPRequest",
             "content-length":"0"
         }
     }' \
   http://localhost:7000/invoke
⚠️ Note: I have changed the
GETtoPOSTin this payload and added abody, that holds a string containing json.Your result should look something like this:
{"statusCode":200,"body":"{\"hello\":\"Fabian\"}"}
Step 5: Simple static routing
Next let’s support a call to GET on /hello as well. In this case we want to respond with {"hello": "world"}. The easiest way to implement some static routing is with a switch statement:
switch (request.context.http.path, request.context.http.method) {
  case ("/hello", .GET):
    // handling
  case ("/hello", .POST):
    // handling
  default:
    return callback(.success(APIGateway.V2.Response(statusCode: .notFound)))
}
With the number of code paths rising, the chances to forget to call callback are increasing as well. That’s why, I’d encourage you to use a code style as below, in which the compiler enforces a response in every code path, before sending your response:
let response: APIGateway.V2.Response

switch (request.context.http.path, request.context.http.method) {
case ("/hello", .GET):
  let body = try! jsonEncoder.encodeAsString(Output(hello: "world"))
  response = APIGateway.V2.Response(
    statusCode: .ok,
    multiValueHeaders: ["content-type": ["application/json"]],
    body: body)
case ("/hello", .POST):
  do {
    let input = try jsonDecoder.decode(Input.self, from: request.body ?? "")
    let body = try! jsonEncoder.encodeAsString(Output(hello: input.name))
    response = APIGateway.V2.Response(
      statusCode: .ok,
      multiValueHeaders: ["content-type": ["application/json"]],
      body: body)
  }
  catch {
    response = APIGateway.V2.Response(statusCode: .badRequest)
  }
default:
  response = APIGateway.V2.Response(statusCode: .notFound)
}

callback(.success(response))
Replace your Lambda.run with the code above.
Step 6: Build your Lambda
As mentioned earlier, this tutorial assumes that you already have a script package.sh in the scripts folder of your repo.
If you don’t, now it’s the time to revisit the Build and Package section of my Getting started with Swift on AWS Lambda tutorial.
This being settled, let’s build the Lambda:
$ docker run \
    --rm \
    --volume "$(pwd)/:/src" \
    --workdir "/src/" \
    swift:5.3.1-amazonlinux2 \
    swift build --product HelloWorld -c release -Xswiftc -static-stdlib
Next let’s package the Lambda:
$ scripts/package.sh HelloWorld
Note: Remember the
.buildfolder is hidden on macOS by default. In Finder use the keyboard shortcutCmd + Shift + .to show hidden files. You can now navigate to.build/lambda/HelloWorld/lambda.zip. If everything went well, your lambda.zip should be around 22MB.
Step 7: Update your Lambda on AWS
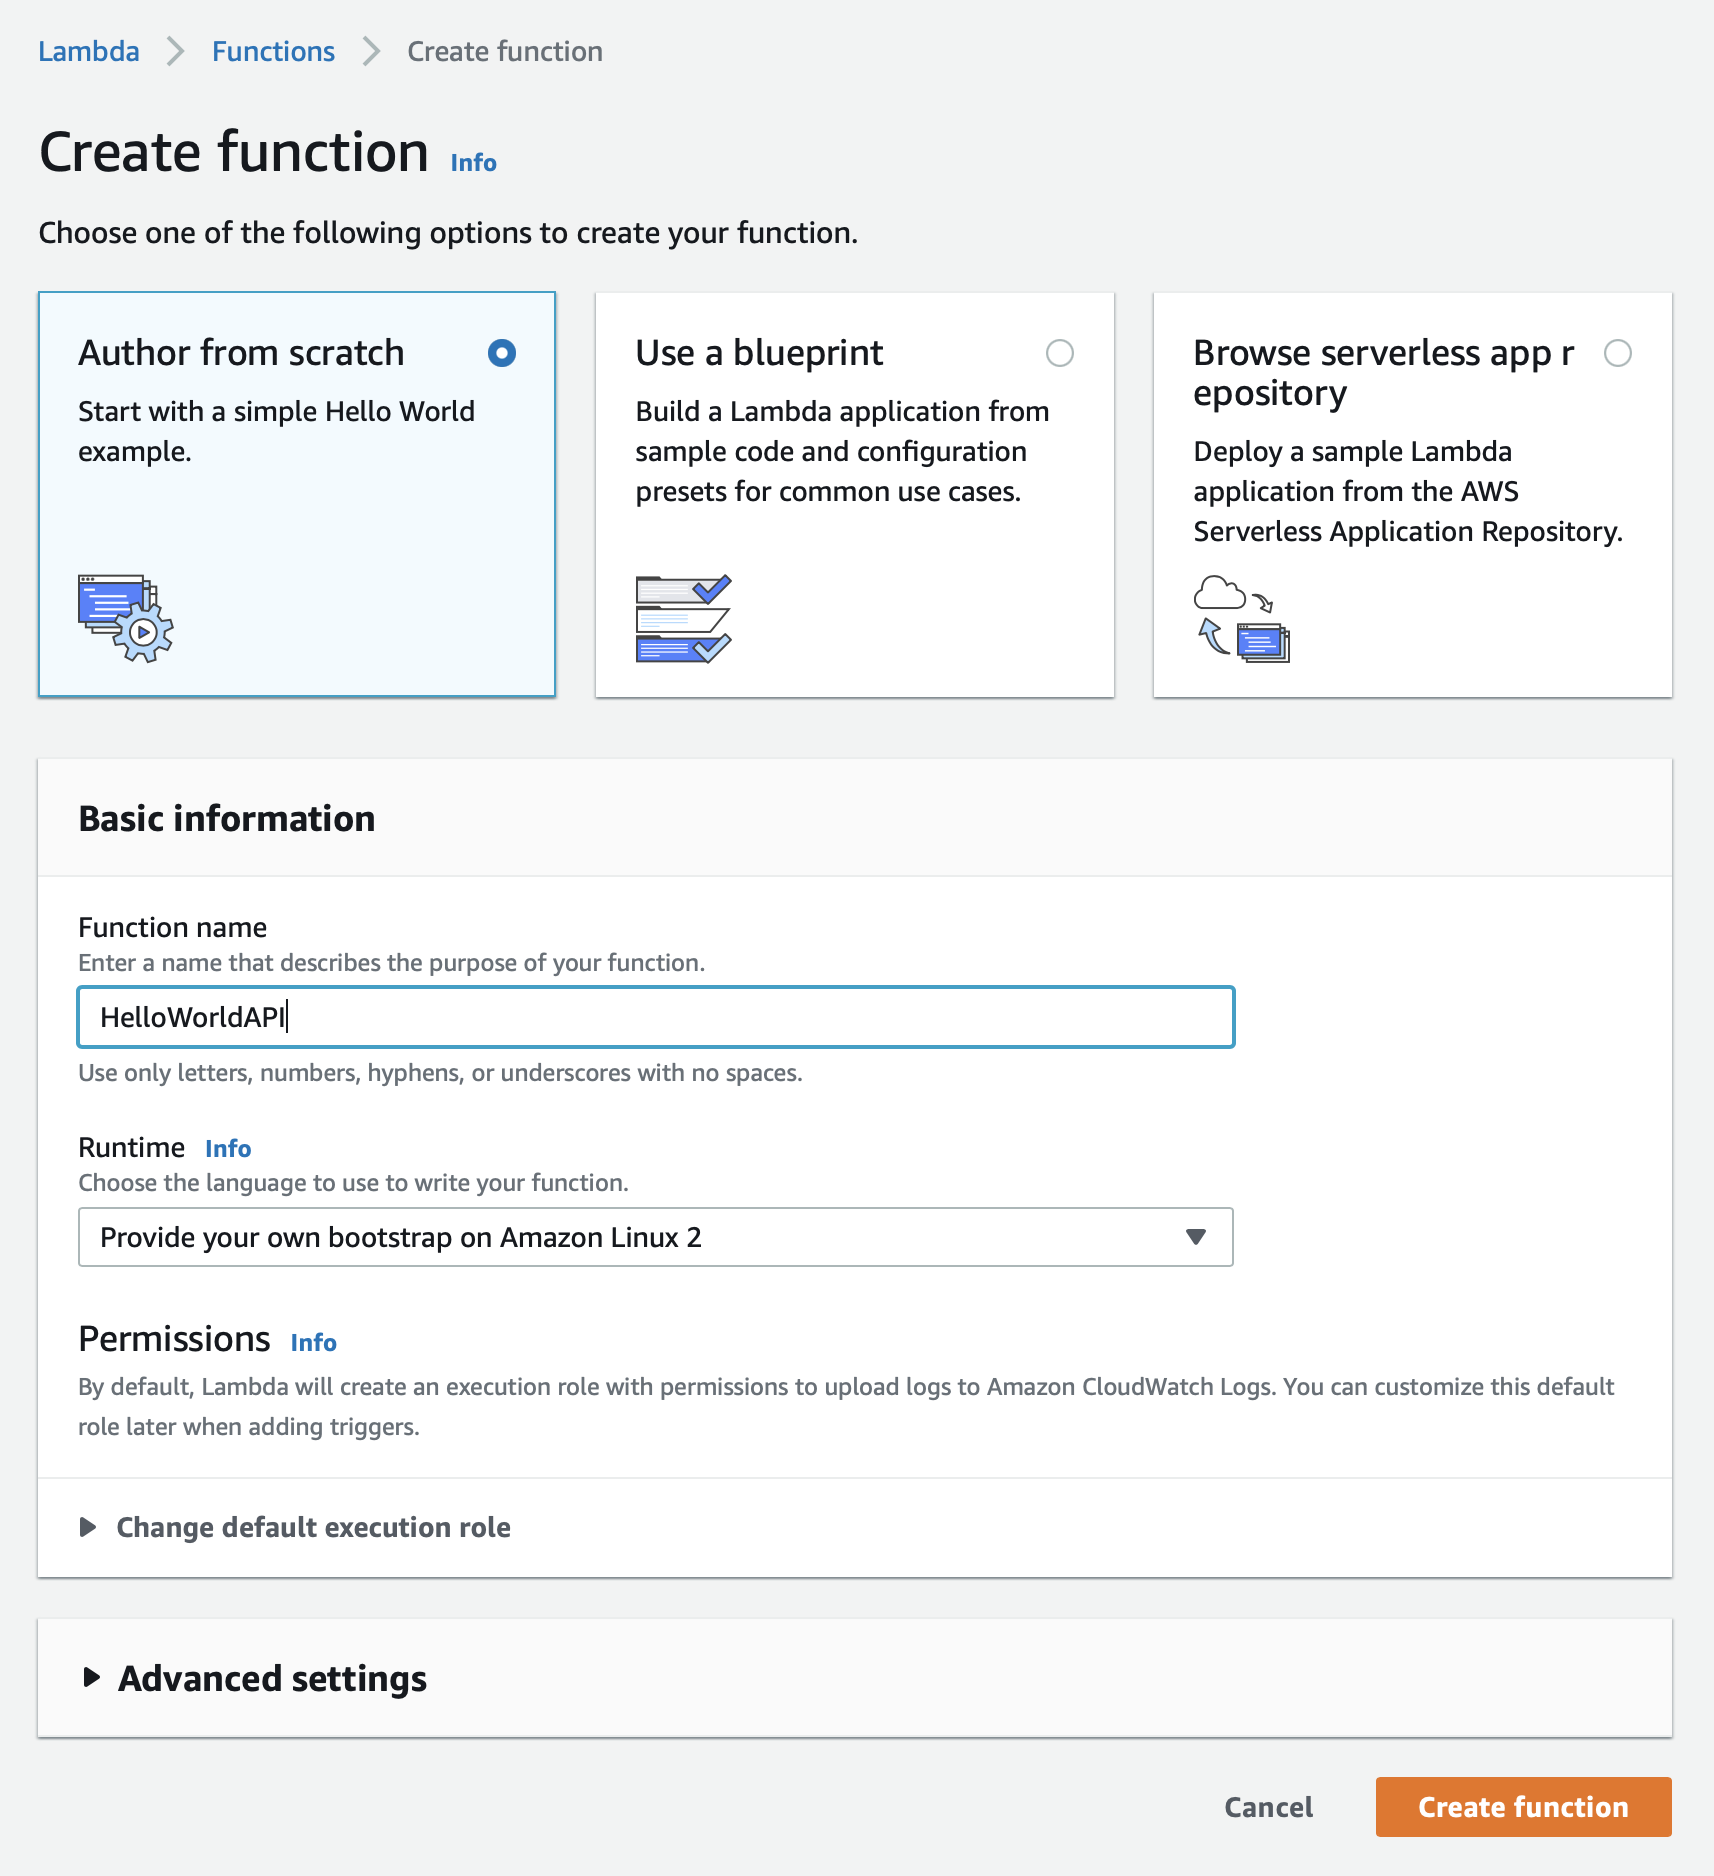
Now it’s the time to create a new AWS Lambda function. Open the AWS Console and navigate to Lambda. Select “Functions” in the side navigation and click on “Create function” in the upper right corner. Make sure “Author from Scratch” is selected and give your function a name. I’ve choosen “HelloWorldAPI”. Select the runtime “Provide your own bootstrap on Amazon Linux 2”. Leave the rest of the settings as is, and hit the “Create function” button to proceed.
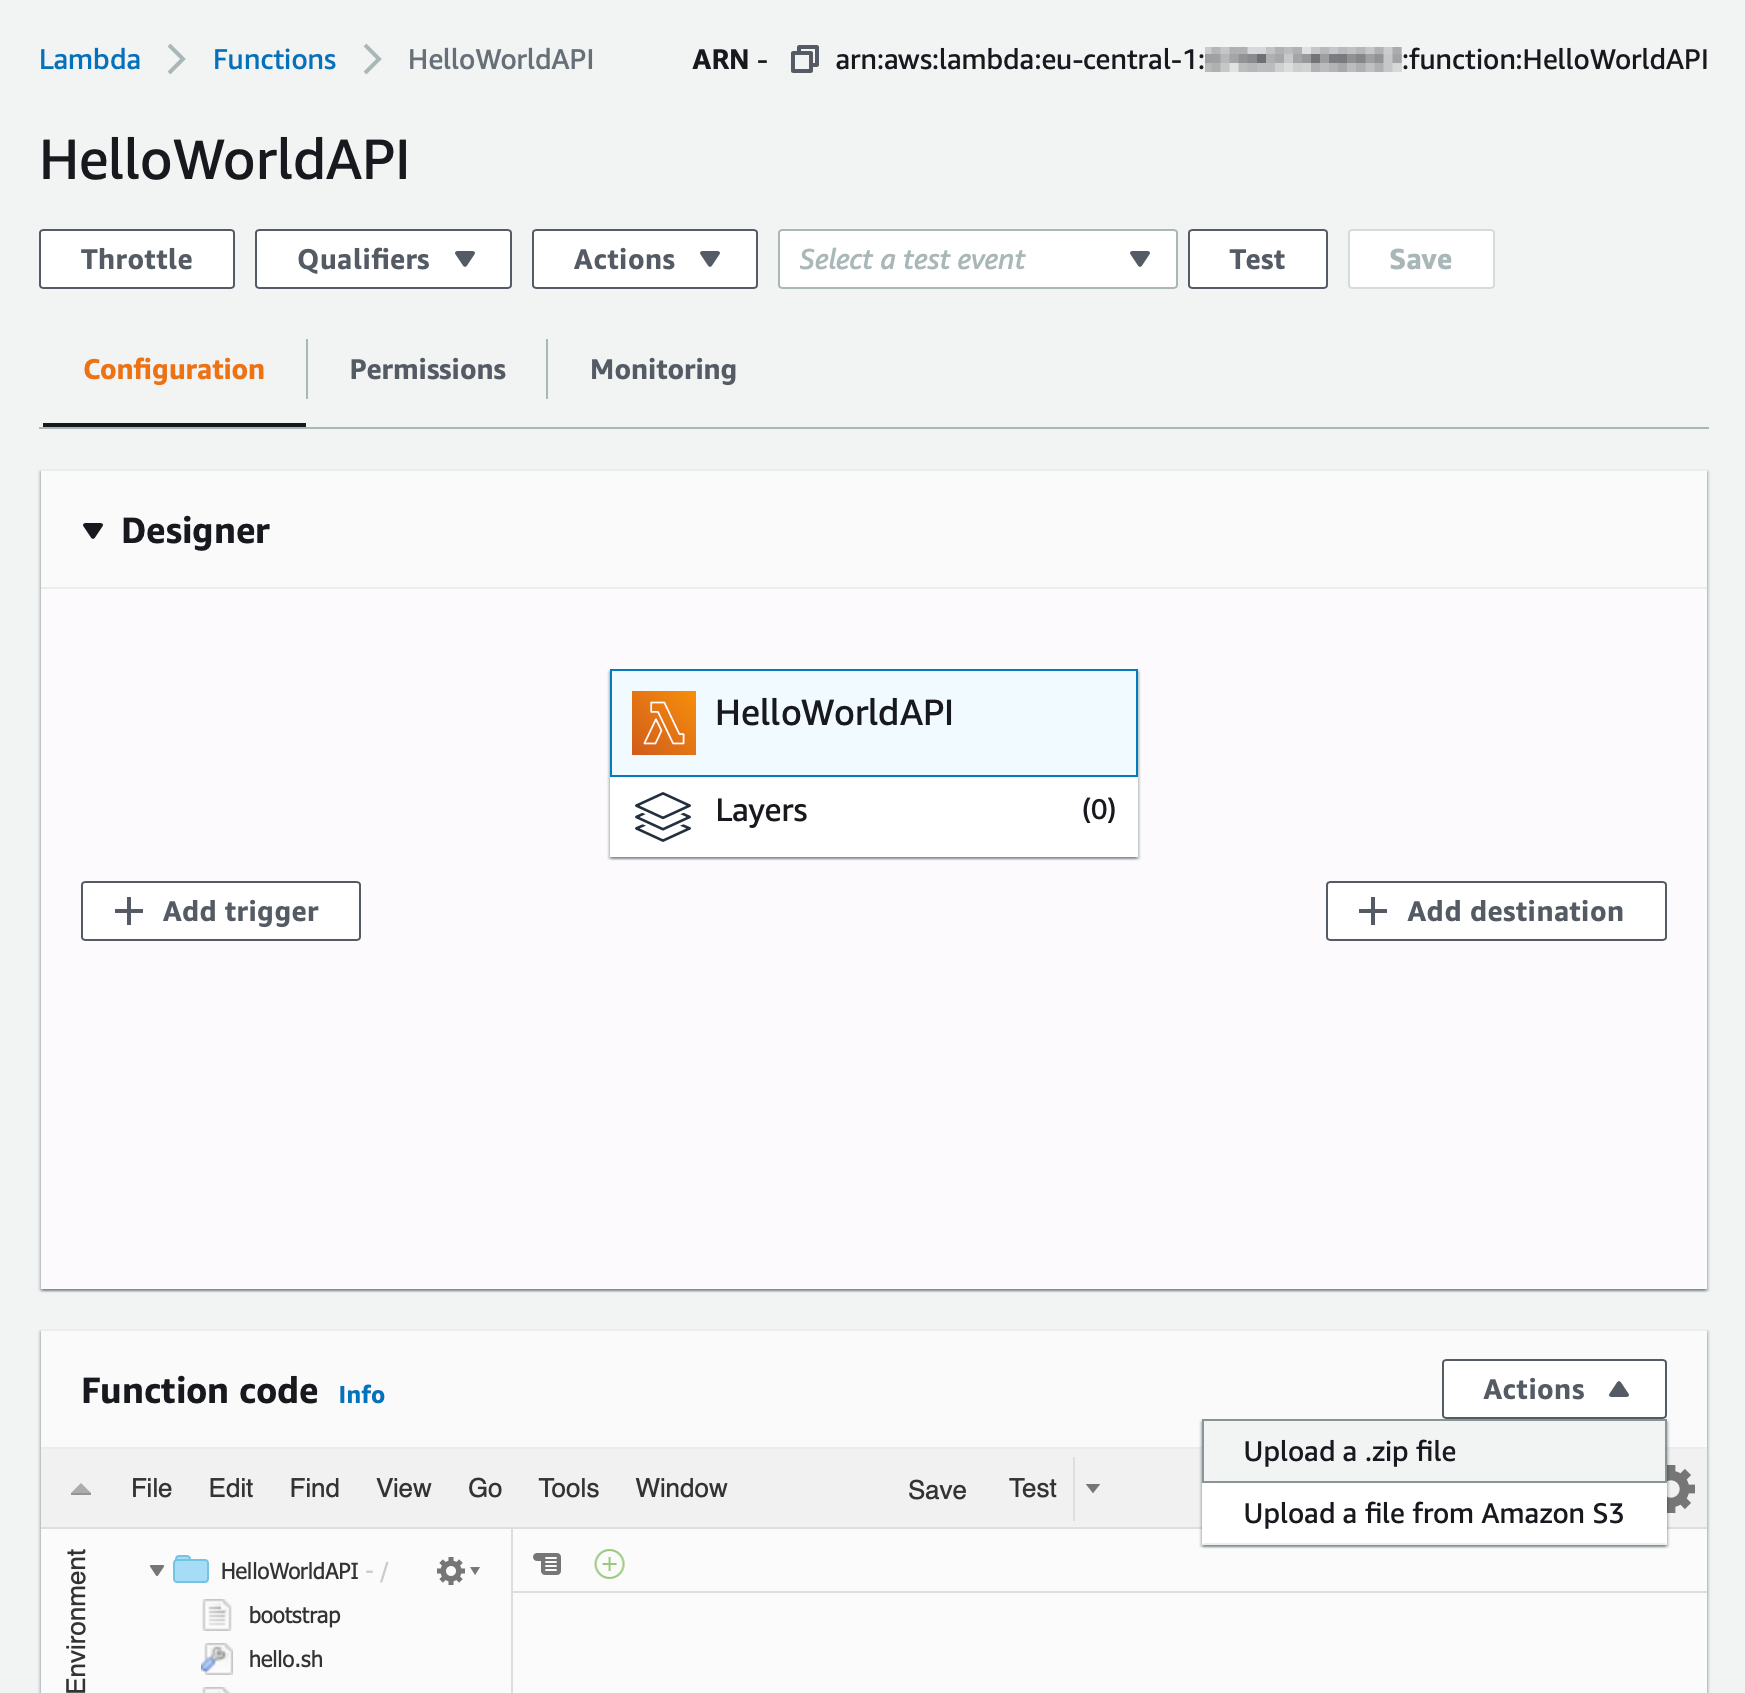
Once the function has been created, your lambda.zip needs to be uploaded.
You should see the section “Function Code” in the lower part of the screen. Click the dropdown “Actions” on the right side and select “Upload a zip file”. Click on “Upload” and select your lambda.zip. Next click “Save”.
Step 8: Connect with an API Gateway
At last an AWS APIGateway must be created and connected to your Lambda.
Navigate to API Gateway in the AWS Console. Select “APIs” in the side navigation and click on “Create API” in the upper right corner. Choose “HTTP API” as your API type and click its “Build” button. A “Create an API” Wizard will be opened.
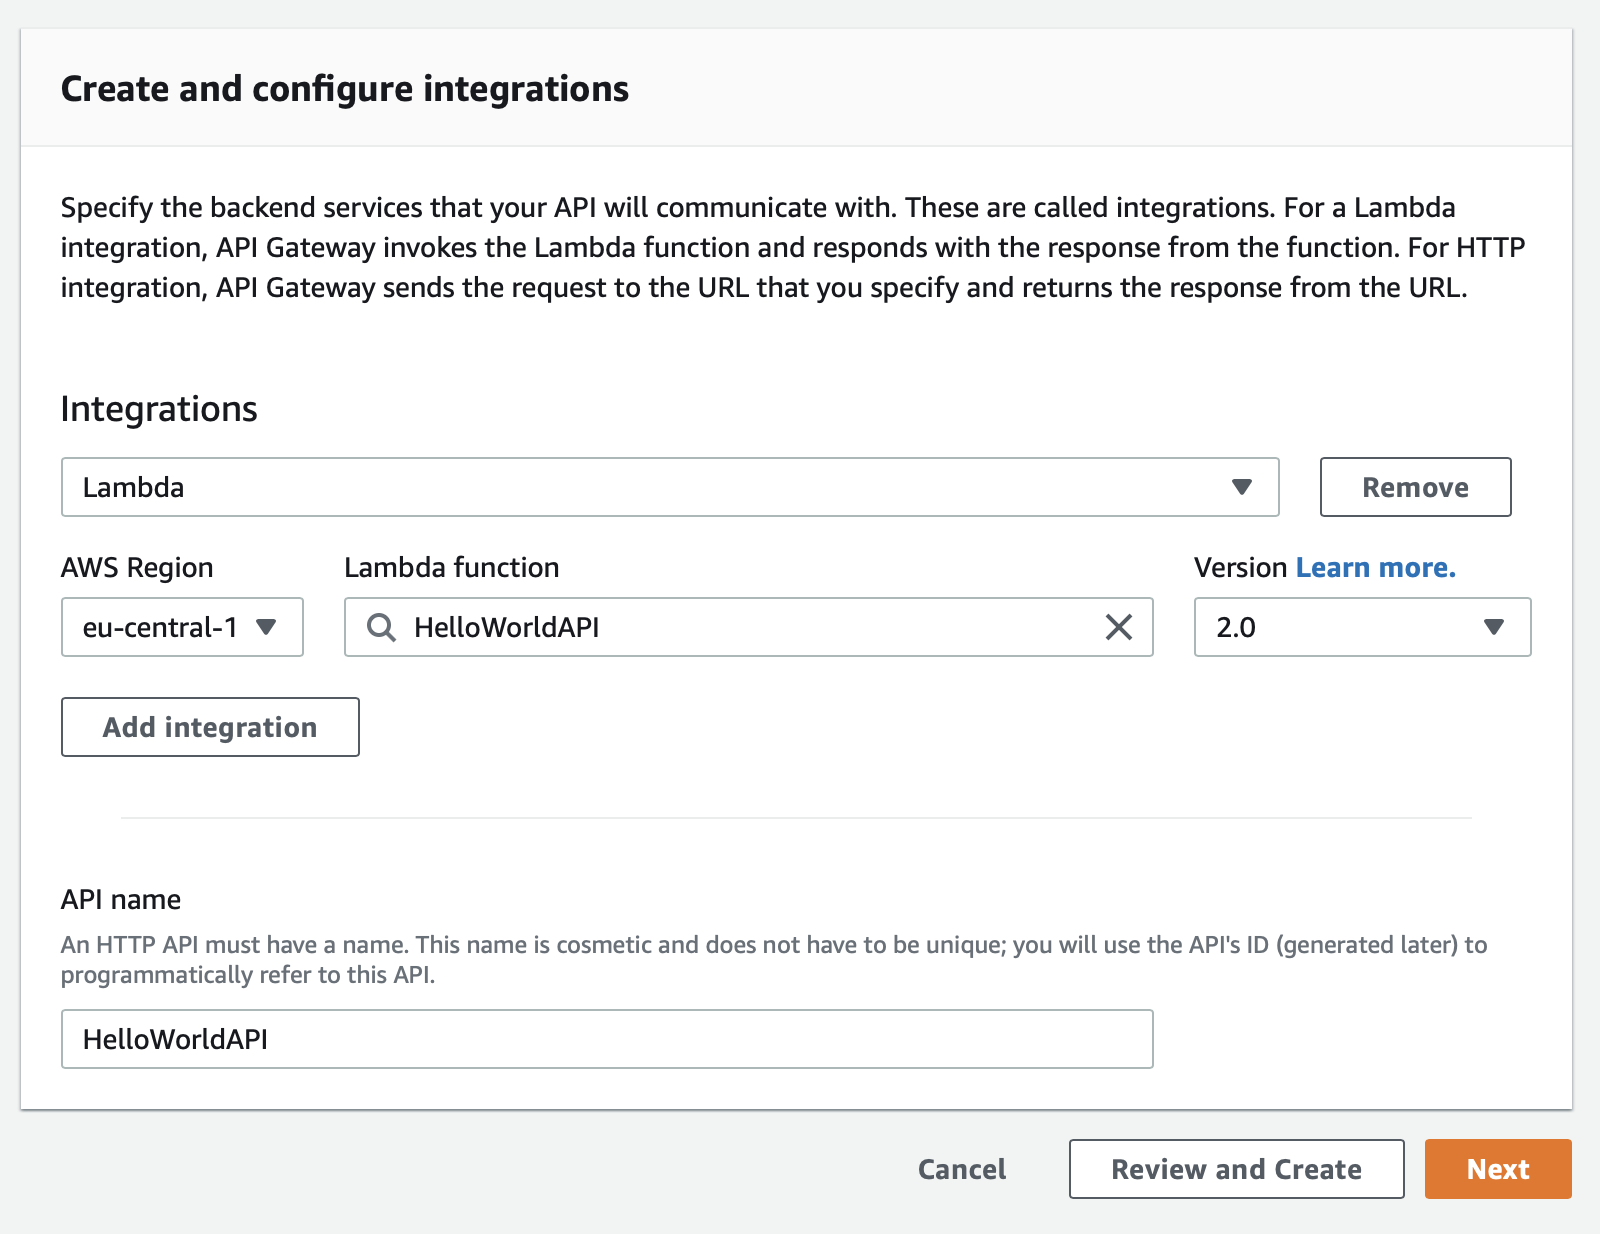
Click the “Add Integration” button and select “Lambda” from the dropdown. Next you’ll need to select the Lambda, you’ve just created. Since mine is called “HelloWorldAPI”, I can find it quite easily. Make sure 2.0 is selected as your Version. (The version number here must match your code’s event types version number: APIGateway.V2.Request). Eventually enter a name for the API (mine is “HelloWorldAPI”) and click “Next”.
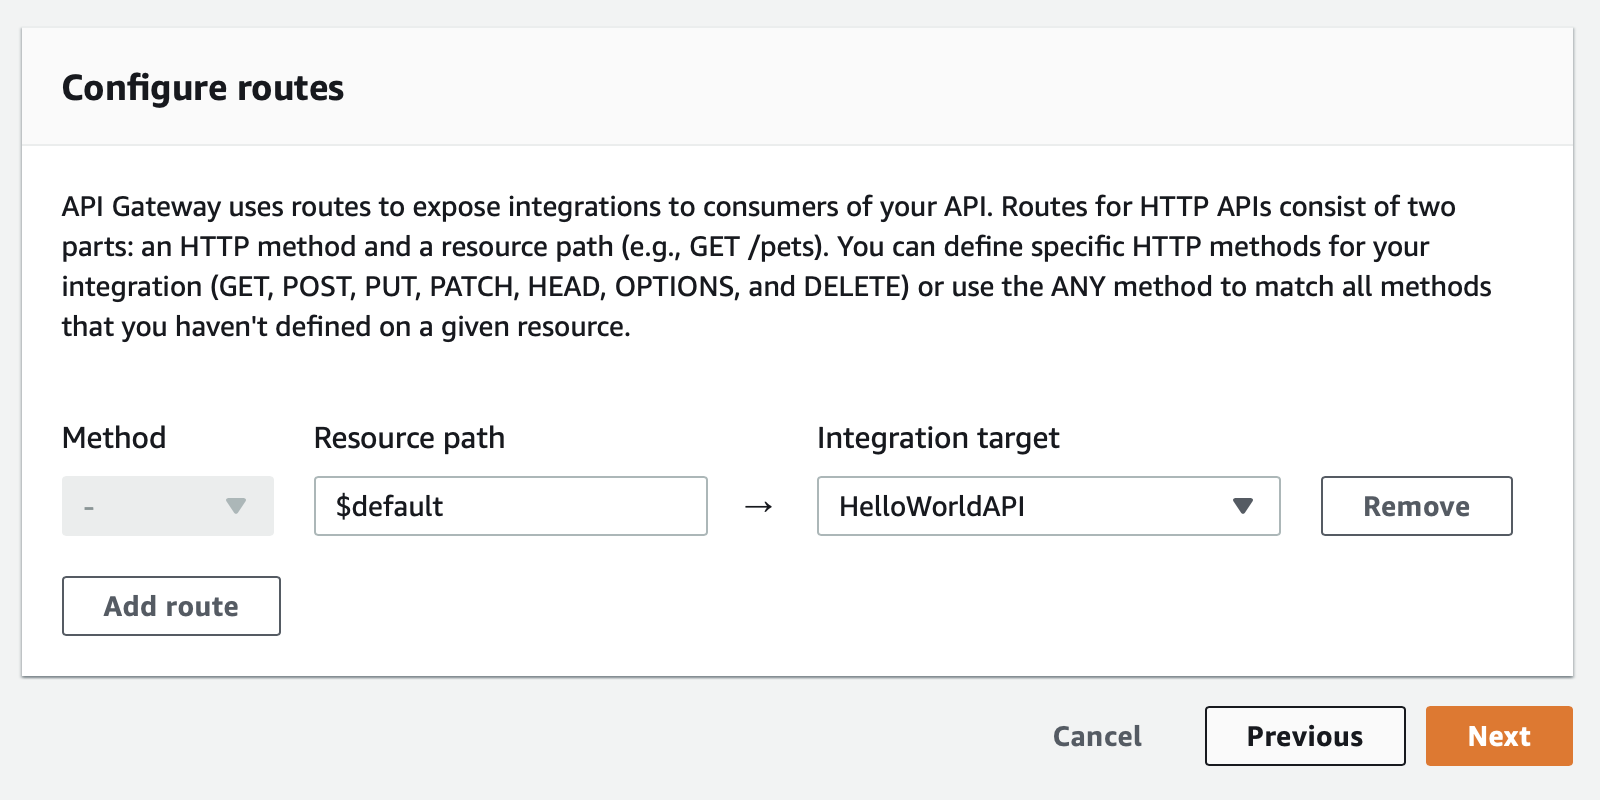
In the step “Configure routes” you must connect the routes your API shall serve with your integration target (your Lambda). The magic keyword to catch all routes is $default. This will proxy all routes to your Lambda.
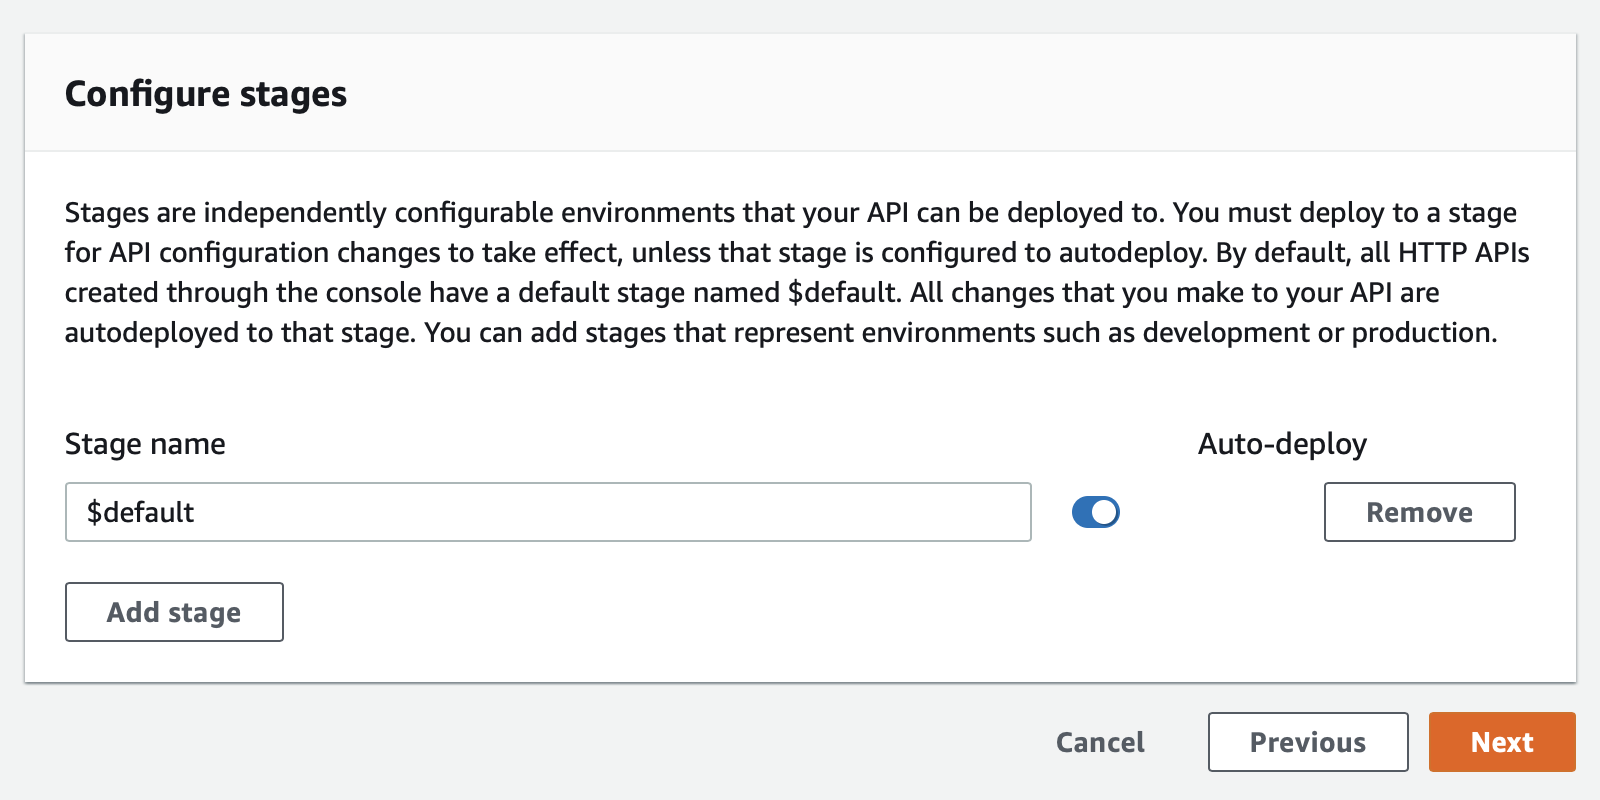
In the step “Configure stages” step everything can remain as is. Click “Next” to continue.
Finally all settings can be reviewed. Click on “Create” to proceed, which should forward you to your new API Gateway:
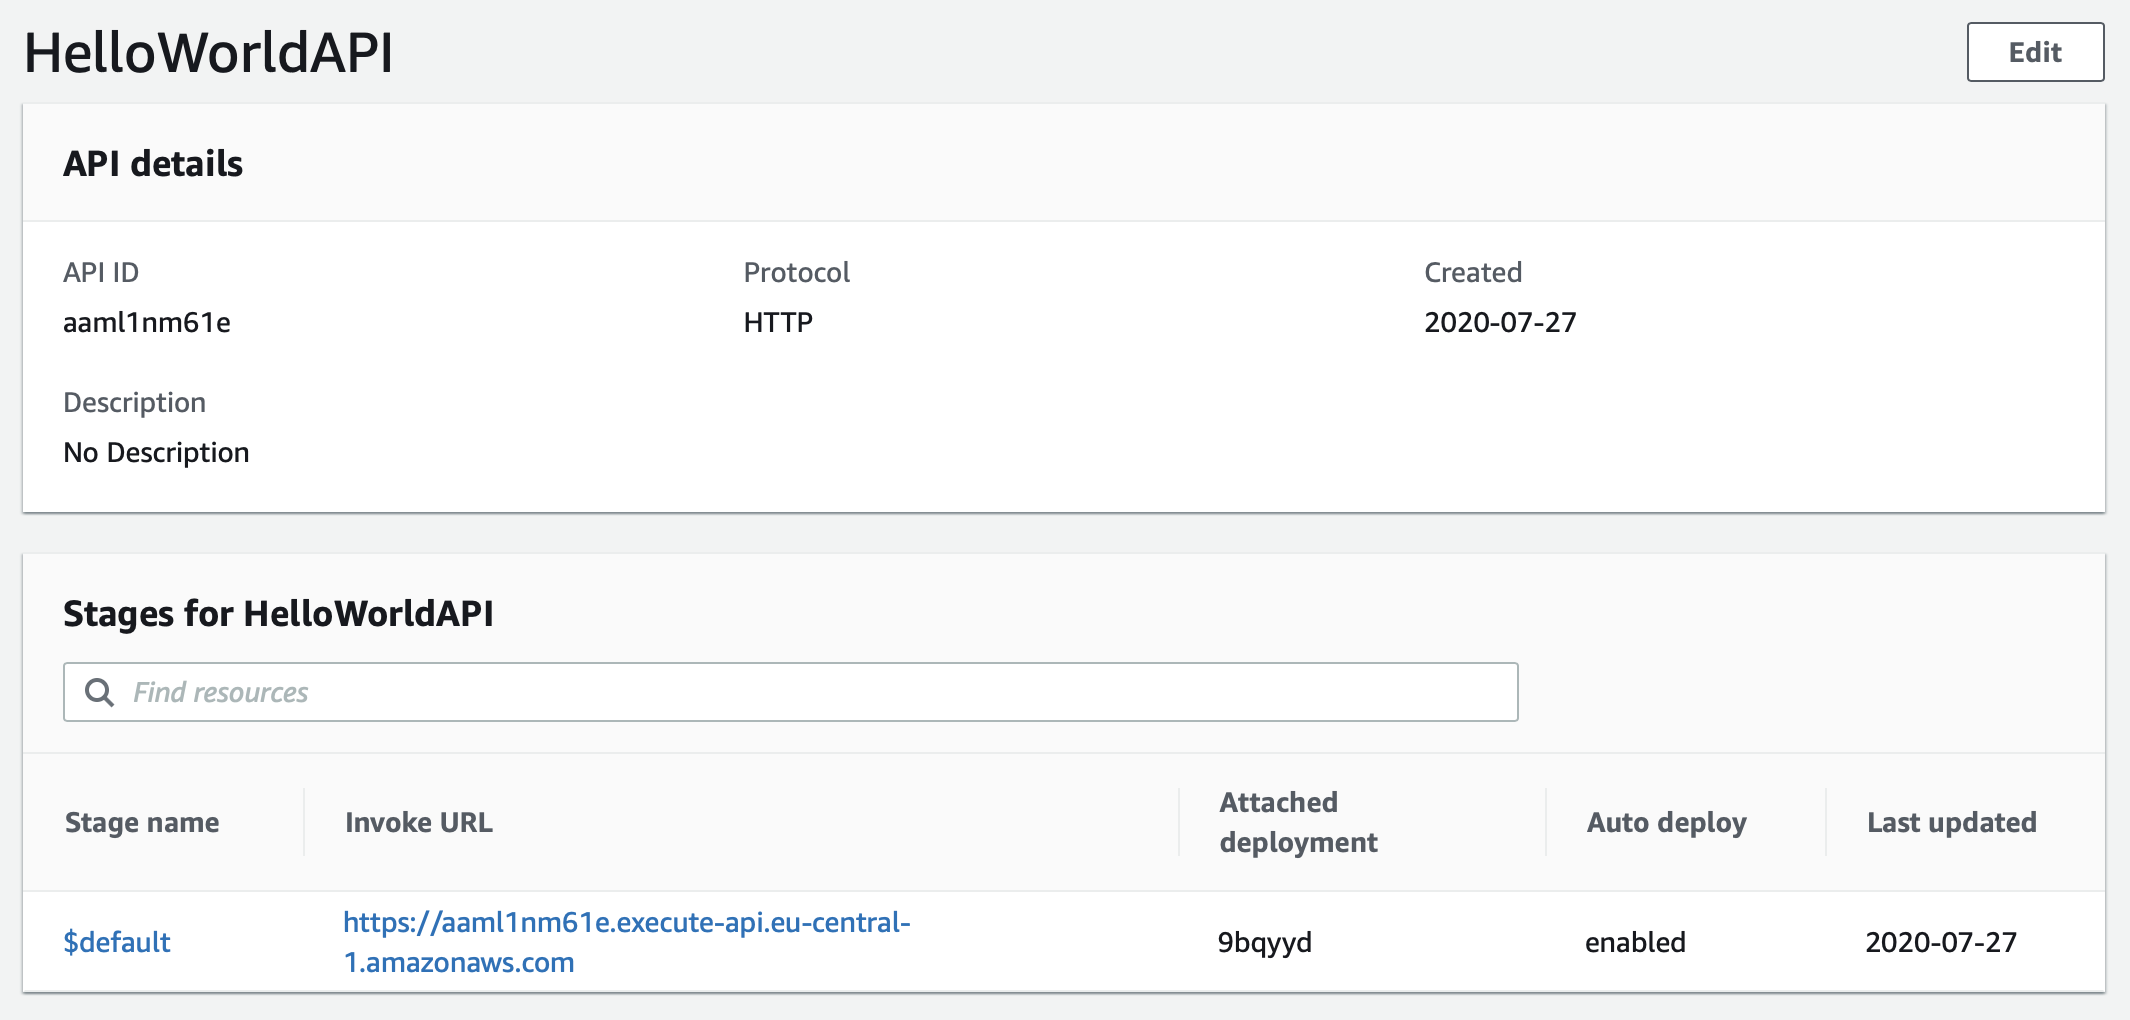
The API Gateway’s url can be seen in the column “Invoke URL” for the stage $default:
Test POST request to /hello (replace {gatewayid} and {region} with your values):
$ curl -i --request POST \
  --header "Content-Type: application/json" \
  --data '{"name": "fabian"}' \
  https://{gatewayid}.execute-api.{region}.amazonaws.com/hello
Test GET request to /hello:
$ curl -i https://{gatewayid}.execute-api.{region}.amazonaws.com/hello
Test GET request to /hello2:
$ curl -i https://{gatewayid}.execute-api.{region}.amazonaws.com/hello2
You should see that the APIGateway answers with a 404.
Closing notes
Hopefully you are now able to create a simple API yourself using swift-aws-lambda-runtime. As you may have noticed the manual process of creating and updating your Lambda functions is quite cumbersome. There are tools out there, that will make your job considerably easier:
Further I want to shout out to some other great Swift on Lambda tutorials that can take you further:
- Sending SNS messages to Slack using EventLoopFutures by @o_aberration
- SES Email forwarding using the community driven AWS-SDK-Swift by @o_aberration
Feedback is highly welcome. I’m @fabianfett on twitter and you can reach me via mail at: fabianfett@mac.com